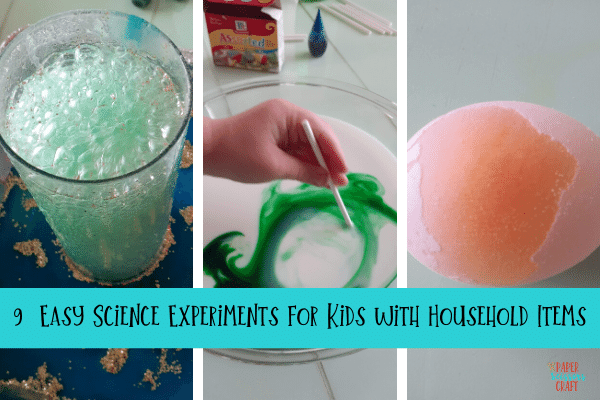
9 Easy Science Experiments for Kids with Household Items
In this post you will learn how to do ten different easy science experiments with your kids using items you already have on hand. No need to run to the store, just open the cupboard.
Easy Science Experiments
I am not a huge science geek. I wish I was, but some of this science stuff is over my head. I mean, I love learning about the human body, anatomy, and that part of science, but when it comes to how things work and operate, you better explain it to me like I’m two. Otherwise, it’s going right over my head.
I think if I had to set up an elaborate science experiment, I would screw it up. Ask me to make a craft or paint something? I’m all in. Ask me to show you how electricity works using a potato? You might be waiting a while, haha. I think science is fascinating, and I’ll watch science experiments until the cows come home. It’s just doing the explaining, that’s the hard part.
I wanted to do some science with my kids. Mostly because I LOVE when they get excited about stuff. I love the WOW factor that science brings to their little minds. Everything is still so magical to them (my kids are currently 3 and 6).
I needed to set up something that was easy for me to do and explain. I also wanted to easily get them involved, so I did some research and we had a science day! We did 10 different experiments (I included a bonus one, it was a last minute decision). The kids loved doing and watching all of them. AND they were able to participate. It was a fun filled day.
The best part was I didn’t have to buy a single thing at the store. I had it all at home.
After our science day, I compiled an ebook with all these science experiments plus 3 bonus ones. They are all done with household items, and are so easy to do. Each science experiment has simple how-to instructions for kids (included with pictures) as well as prompt questions. The questions help young scientists to hypothesize and analyze. They are great for having a paper copy of the experiments with questions, or a science workbook for school. You can check that out here. (You can also download some of the individually, I have included those links below).
I recently used this for my daughter, who is in second grade, because she was learning the scientific method, and this helped give her a visual.
These are so easy, anyone can do them, (including me). And the there is like a total of 10 supplies. Check out my resources page for supplies you should commonly have on hand for kids crafts. Here’s what we did.
This post contains affiliate links.
9 Easy Science Experiments for Kids
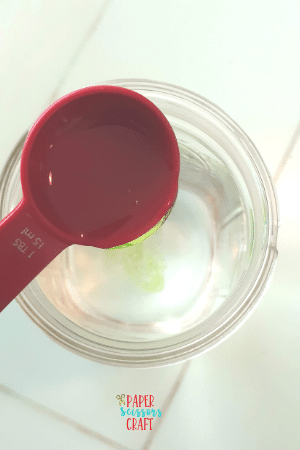
Tornado in a Jar
You’ve probably heard of this one before. It’s the typical at home science experiment: make a tornado in a jar. I will have to say, it was harder than I had anticipated to get that funnel going.
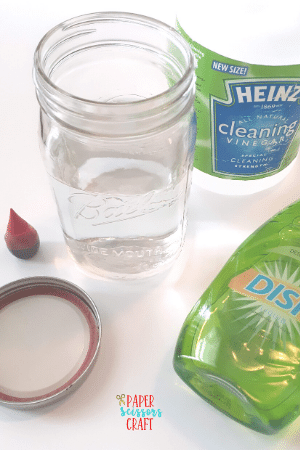
Supplies:
Jar with a lid (if you don’t have a jar you can use anything round container with a lid)
Water
1 tbsp. Dish Soap
1 tbsp. Vinegar
Food coloring (optional)
Instructions:
Fill the jar about 2/3 of water.
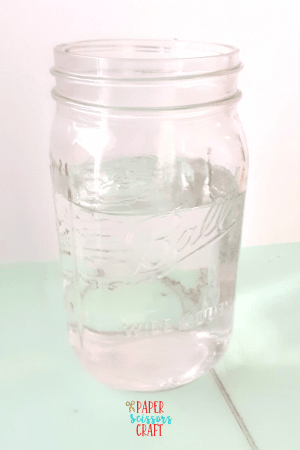
Add in the vinegar, dish soap and a few drops of food coloring. I recommend not making it super dark because then it’s hard to see the funnel.
Screw on the lid and spin the jar in a circular motion, like a tornado.
Observe what the water does. (and take note if you want in your Science Experiment eBook).
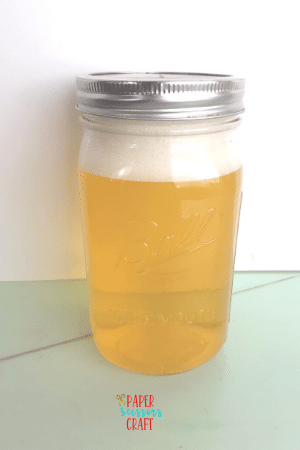
Sorry, we did not get a good picture. No matter what light I put it in, you can’t see the funnel on the camera. We also didn’t get as good of a funnel as I wanted. We tried filling the jar up less, or putting in less soap, and trying different colors. We got the same type of funnel every time. If you have any tricks for making a crisp funnel, let me know. It was still a cool experiment, and the kids loved it.
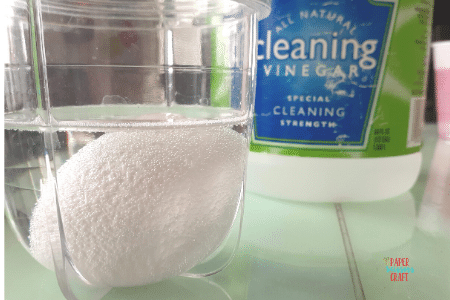
Disappearing Egg Shell
This experiment is really cool. It even gives adults the wow factor. It’s super simple, but it does take some time. So, it’s a good idea to start with this experiment, and then observe it throughout the day while you do all the other experiments. Included in the Science ebook is a section to document the changes in the egg at different time intervals.
Supplies:
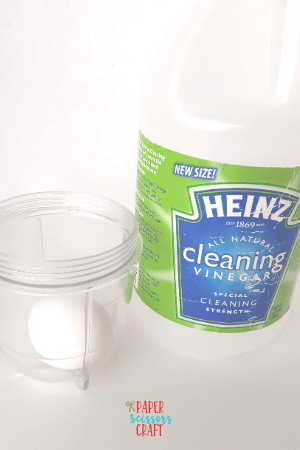
A clear cup
Egg (not boiled, just a plain ole’ egg)
Distilled Vinegar
Instructions:
Place the egg in the clear cup.
Pour the vinegar over it until the egg is completely covered.
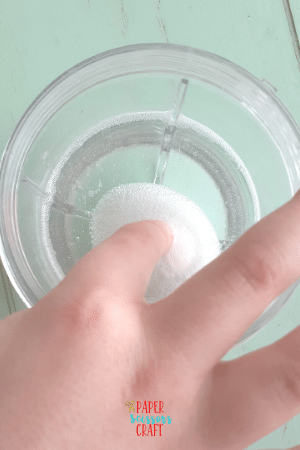
Let it sit, and sit and sit and sit.
It will take about 24 hours for the egg shell to completely dissolve off, but you can see the vinegar start to eat it off right away. The bubbles start fizzing and it looks cool.
If you feel the egg after a couple of hours, it’s slimy. My kids liked that part. (If you are documenting the experiment, I would recommend having them touch it and write down how it feels).
The next day it was super slimy and we helped rub it a little bit to get the shell off. It kinda just rubs off. And then you have an egg without the shell. It’s awesome. Keep in mind, it’s not boiled, it’s just the egg without a shell. It’s squishy, and you can squeeze it pretty hard. I can attest to that because when I asked my 3 year old to feel it, he squeezed it as hard as he could. Haha. Luckily, it did not break.
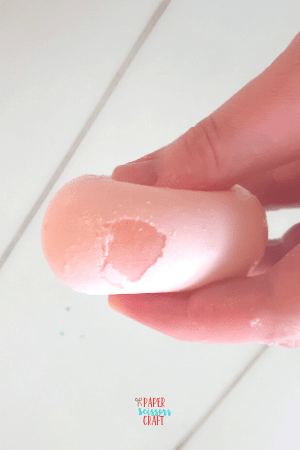
However, it can break because we also did that a few days later. We ended up observing it for 3 days. Not much changed in the last day.
What’s the science behind it?
“The shell of an egg (typically a chicken egg) is made up of primarily calcium carbonate. If you soak this egg shell in vinegar (which is about 4% acetic acid), you start a chemical reaction that dissolves the calcium carbonate shell. The acetic acid reacts with the calcium carbonate in the egg shell and releases carbon dioxide gas that you see as bubbles on the shell.” (source)
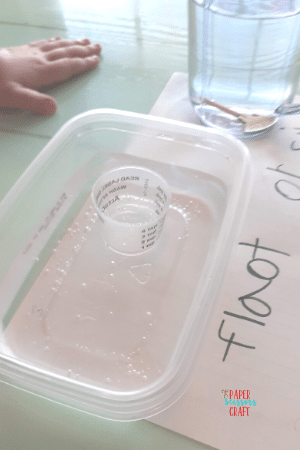
Float and Sink Experiment
One of the most interactive science experiments for the kids was the float and sink. The kids have more control over this experiment. In fact, after I explained to my daughter what we were going to do, she put it together. She made the worksheet, picked the supplies, and she was ready to go. I made her worksheet into a FREE printable, and made another FREE printable based off what I had envisioned in my mind. You can download both of those here. It’s also included in the Science ebook.
There are several different ways to do this experiment. You can use containers with water, your bathtub, your sink, or, in the summer, your pool. It just depends on what you have access to and want to do.
Here’s how we did it.
Supplies:
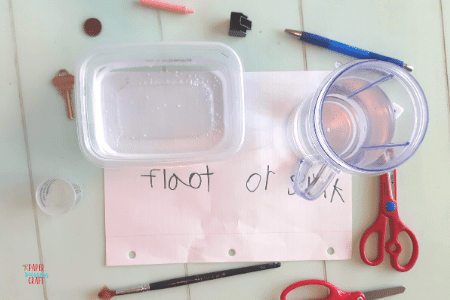
2 clear containers (preferably tall enough to let something sink)
Water
Objects to test, i.e. keys, toys, blocks, scissors, pens, legos, small cup, etc… (it’s fun for the kids if you have them go around the house and pick objects they want to test)
Optional: Float or Sink Worksheet
Instructions:
Fill both containers with water.
One container will be for guessing if the object will float, and the other for if the object will sink. Label the containers accordingly.
Have your child pick an object and place it in whichever container they think the result will be. For Example: if they think it will float, have them place it in the container labeled float and observe. (If you’re using your pool or tub, you could just have the kids give their vote if it will float or sink before you drop it in. If you’re feeling adventurous, you can write them down and document it.)
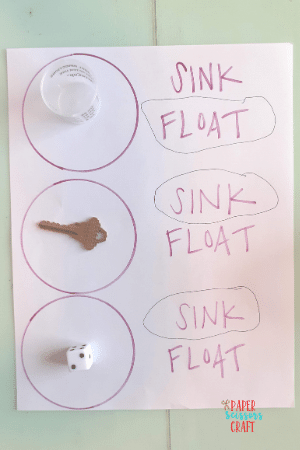
They might be surprised by which ones float and which ones sink. This is such an easy experiment, but kids love it. My kids kept looking around the house for other objects to test.
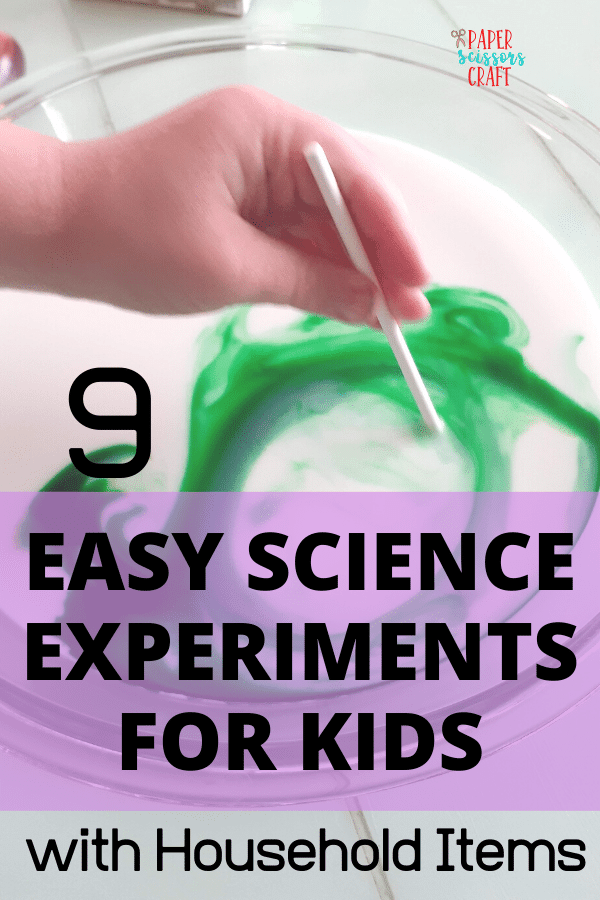
Dancing Pepper Science Experiment
The dancing pepper experiment just has a fun title! Another super easy set up and super cool reaction.
Supplies:
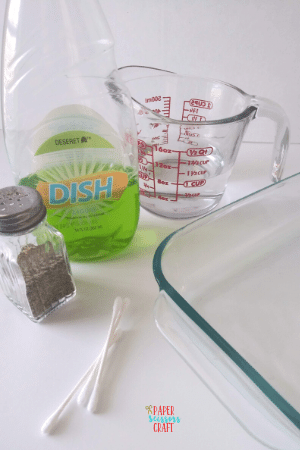
Pepper
Water
Dish soap
Q-tip
Shallow pan or container
Instructions:
Place about half an inch of water into the shallow container.
Sprinkle the pepper on top of the water.
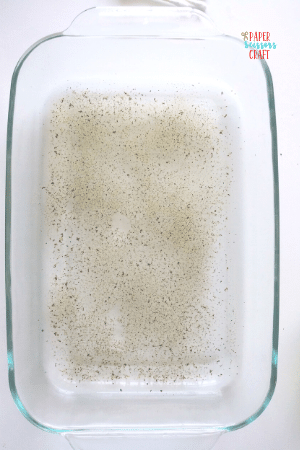
Place a little bit of dish soap on the table. (like a few drops)
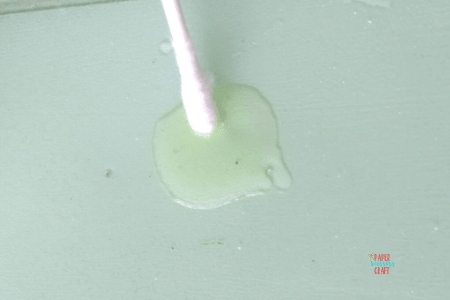
Dip your Q-tip into the soap. (No need to lather it up)
Place the Q-tip on top of the pepper sitting on the water.
Observe. Watch as the pepper reacts by jumping away from the Q-tip. And you can do it again and again. The kids love it, and who doesn’t have an endless supply of pepper?
What’s the science?
“Well, pepper is hydrophobic, meaning that water is not attracted to it. Because of that, the pepper can’t dissolve in the water. But why do the flakes float on top of the water? Water molecules like to stick together. They line up in a certain way that gives the top of the water surface tension. Because pepper flakes are so light, and hydrophobic, the surface tension keeps them floating on top.
The next question to think about is why the pepper shoots to the sides when soap touches the water. Soap is able to break down the surface tension of water—that’s part of what makes soap a good cleaner. As the soap moves into the water, and the surface tension changes, the pepper no longer floats on top. But the water molecules still want to keep the surface tension going, so they pull back away from the soap, and carry the pepper along with them.” (source)
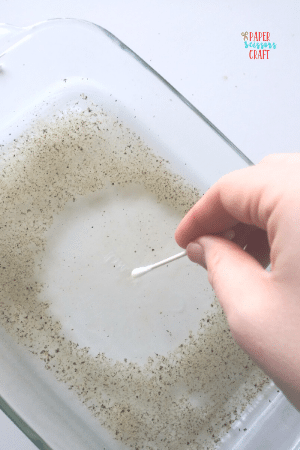
Milk and Soap
This experiment is a lot like the pepper and water, just with different supplies. It has a slightly different effect because it has color. I think the pepper jumps a little better than the milk, but you can make your own judgments, and let me know what you think.
Supplies
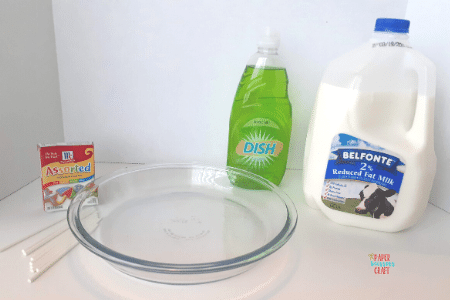
Milk
Food coloring
Dish soap
Q-tip
Shallow container or pan
Instructions:
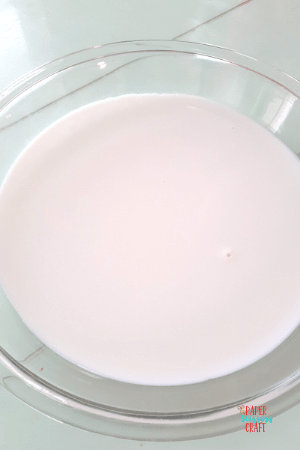
Fill your shallow container with about half an inch of milk.
Place a couple drops of food coloring on the milk in different areas about 3 inches apart from each other, if you’re using different colors.
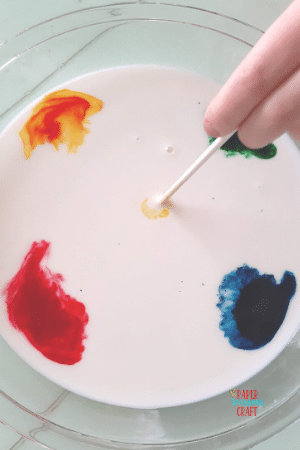
Place a few drops of dish soap on the table.
Dip your Q-tip in the dish soap so that just the tip is covered in soap.
Touch your soap dipped Q-tip on the food coloring, or around the food coloring, and watch the colors dance.
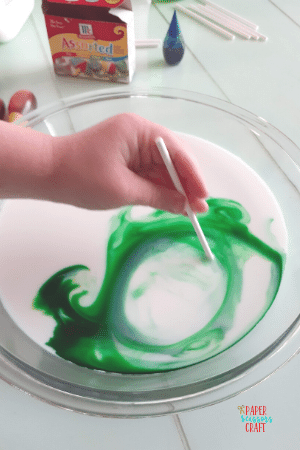
You can repeat this again and again, and the kids love it. After a while they just go crazy and started mixing colors. I mean, who cares about the dancing colors, just fill some milk in a bowl with food coloring and let them go town. Haha.
The Skittles Easy Science Experiments
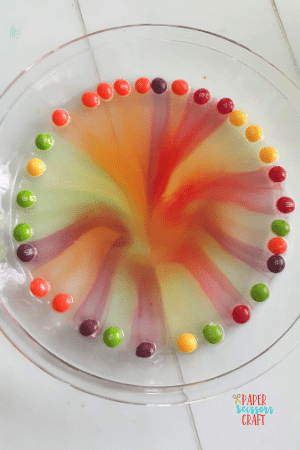
The Skittles experiment is another super fun experiment that is super quick. You could do it again and again and it would just be awesome. Plus it doubles as a treat.
All you need is some skittles, water, and a shallow pan. You line up the Skittles, pour some hot water on them, and watch them “glow”.
The affect of the skittles makes it awesome. You can find the full details to the experiment here: The Skittles Experiment.
And yes, the Skittles are still good after they have no color. I’m taking my kids word for it.
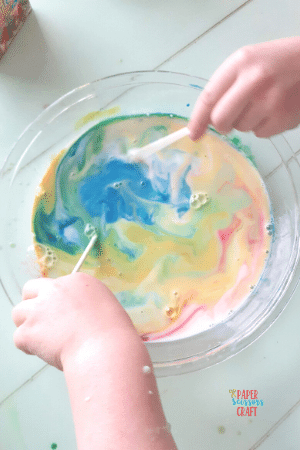
Clouds and Rain Drops
I think this experiment is the best for teaching a concept that kids see all the time. We all witness rain, but understanding how it works is a completely different story. It’s interesting learning the water cycle. If you’re looking for a quick video to explain it all here is a good one: Science Behind Rain.
My kids played with this for at least an hour. They wanted to try all the different colors with different volumes and watch the colors swirl around. It was fun. I’d say this was in their top three.
Make Summer easy with the Ultimate Summer Activity Binder
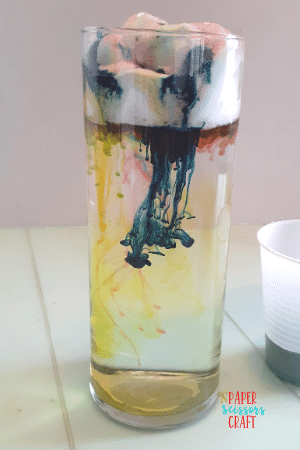
Walking Water or Walking Rainbow Experiment
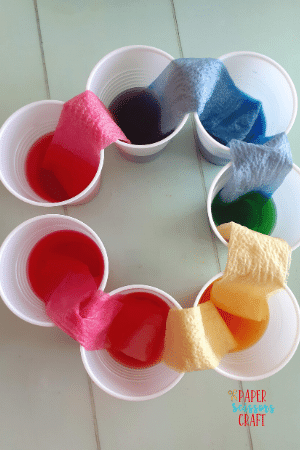
I think this one was my favorite. It’s just so cool how science works. And it just looks awesome.
Walking water is done by placing different colored water in different cups with paper towels and watching as the water walks up the paper towels into an adjacent empty cup. The colors are placed so that when they meet in the empty cup, it makes a completely different color. You can find the complete instructions here: Walking Rainbow Experiment.
It is not a quick experiment, but worth it. After about 1.5 hours, it’s finished. It’s fun to watch the process. Definitely another experiment that you can document as you go.
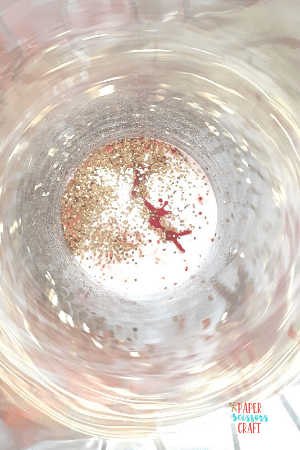
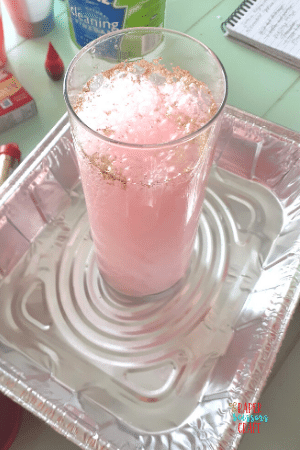
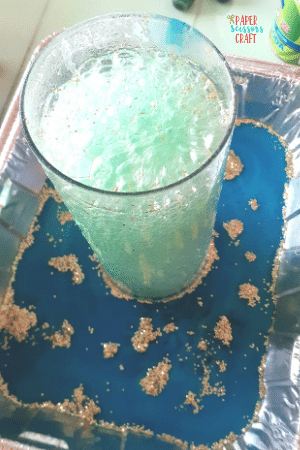
Glitter Lava Easy Science Experiments
Most of us have seen the vinegar and baking soda experiment. That goes way back to my day. Haha. This one is a slight twist on it. (but not by much).
Supplies:
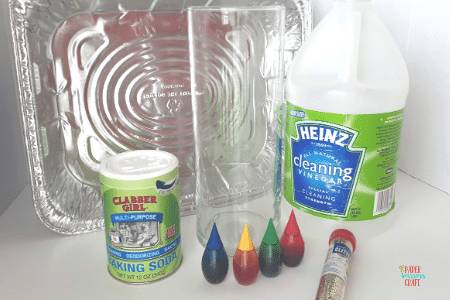
¼ cup Baking Soda
½ cup to 1 cup Vinegar
Food Coloring
Glitter (optional)
A vase, or another type of container
A pan (or something to be the catch-all after the explosion)
Instructions:
Prepare the experiment by placing the vase in the pan (or container)
Place in the vase the baking soda, a few drops of food coloring, and about a tsp of glitter. (unless you want more). I recommend you stir them up a little to make sure the vinegar hits it evenly.
TIP: You might need more or less baking soda depending on how big your container is. Just know that it doesn’t take much. I’d say doing an even layer over the bottom of the container should suffice. But since this experiment is so easy, you could experiment with the measurements to find what works the best. We realized that if you put too much baking soda in, some of it won’t even touch the vinegar.
When you’re ready, pour the vinegar into the vase and watch the baking soda explode.
TIP: I just poured the vinegar in slowly until it was done reacting with the baking soda. You don’t technically have to measure it out, but do what feels comfortable to you.
You can do this experiment again and again! Just know that once the baking soda gets wet, it will not react again.
Bonus Easy Science Experiments
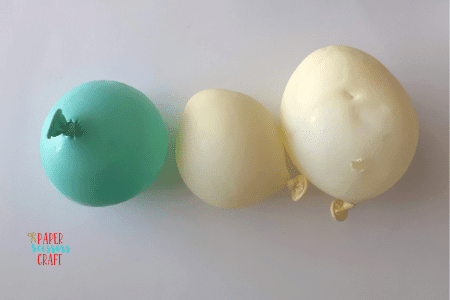
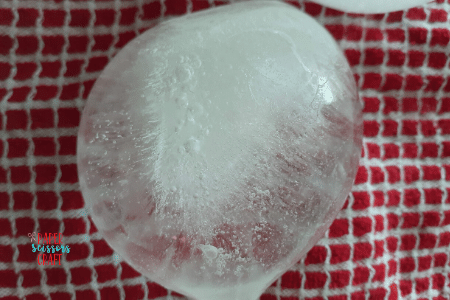
Frozen Balloons
We just did this one day on a whim. Another simple experiment that I thought wouldn’t be that cool, but the kids loved it. We kept the balloon ice in a bowl all day and the kids kept going over to play with them.
Supplies:
Balloons (any balloons will do, you do not need water balloons)
Water
Instructions:
Fill as many balloons as you want (or as many as can fit in your freezer) with water and tie them closed.
Place balloons in the freezer, just anywhere. It would be cool to put them in different places because they will make different shapes depending on how they freeze.
Take out once frozen, “pop” balloon. It doesn’t really pop, it’s more like take the covering off the ice.
Observe the ice. We had some turn out pretty cool. This is a great activity to ask the kids what they think will happen. They might be surprised.
I think my kids think I’m super smart after doing all these experiments…probably not. But it was really fun. Let me know if you try these out and how they worked out, or let me know some of your easy science experiments.
Don’t forget to get the Easy Science Experiment Workbook which includes all of these experiments plus 3 bonus ones. Also get great questions and prompts to help kids become little scientists.
Related: How to Make Simple Balloon Rockets for Kids

Omg I love this!! I used to be such a creative person. Becoming a mom seems to have sucked the creativity out of me haha. I love how simple and doable these experiments are. I’m definitely doing them with my elder one. He’s going to love me for them!! Thank you they’re awesome!
Thank you! haha, I totally get that! I know, I LOVE how simple they are!
So creative! These are amazing 😄
Thank you!
Wow, these experiments are so cool! These helped me so much for my school!
Lisa recently posted…13 Super Simple 4th of July Holiday Crafts for Kids and Toddlers
Yay! I’m so glad!